We’ve said it time and time again here at ATV trail rider magazine; it’s no use having a huge engine and lots of power if you don’t have the right suspension system with the proper adjustments to keep it all under control. Back in the 80s power was much more something stock ATVs were lacking with about half of what they offer today. A properly tuned suspension will make a world of difference in the performance and enjoyment you get from today’s powerful and versatile off-road vehicles.
It is still true that the stock shocks on most ATVs are a monotube design, with the oil reservoir inside the shock itself but more and more models, especially Limited Edition models or specialty packaged ones, come with extremely advanced shocks offering users of the mainstream, the same level of control and adjustment possibilities as what is now expected on the racing scene. With this basic design the oil is prone to heating due to the friction of the shock’s travel and this can seriously reduce the effectiveness of the shock. Excessive heat can make the oil foam. Foaming is a common problem with oil-lubricated components. A collection of small bubbles of air accumulates on or near the surface of the fluid, which can lead to excessive oxidation, cavitation, the reduction of lubricating properties of the oil and hydraulic system failure. In the case of stock ATV shocks it will rarely come to a point of complete failure but a rider on a longer than usual and maybe more challenging and bumpy trail can get to a point where the negative effects of an overheating shock and foaming oil inside of it, will be felt. The capacity of the lubricant to sustain the load will be lowered which could cause the suspension to bottom-out, over the same bump that was previously conquered without a problem.
IRS (independent rear suspension) is used on many new ATV styles that are meant for rough terrain. This type of ATV suspension helps the rear end of the vehicle maintain better contact with the ground when riding over rocks, logs and ruts. The ride is less bumpy, and easier on the body. Many riders prefer the sliding action of a straight rear axle when cornering on faster trails. Stability is excellent with a straight axle. There are fewer moving parts to break or wear and an SRA is generally tougher. Many beginning riders like an SRA for the stability, but learning the feel of the different riding action of an IRS only takes a bit of getting used to. Adjustments wise the only difference is that you need to make sure you always dial in the same values on both sides.
Adjustability is important not just for high-performance ATV racing, but also for comfort and optimal control on any ATV or Side-by-Side. It used to be only aftermarket high-end shocks that allowed compression and rebound adjustments. Now more and more of you possess these on the new ATV or Side-by-Side you might have recently bought and maybe you’re not quite sure of what needs to be done with them. Many just leave them as they come from the factory without adjusting anything and if you never push the ride in performance at all, that is just fine but at the very least spring preload should be adjusted according to your weight, riding style and type of terrain to conquer. It’s just too easy to do to neglect and can make a huge difference.
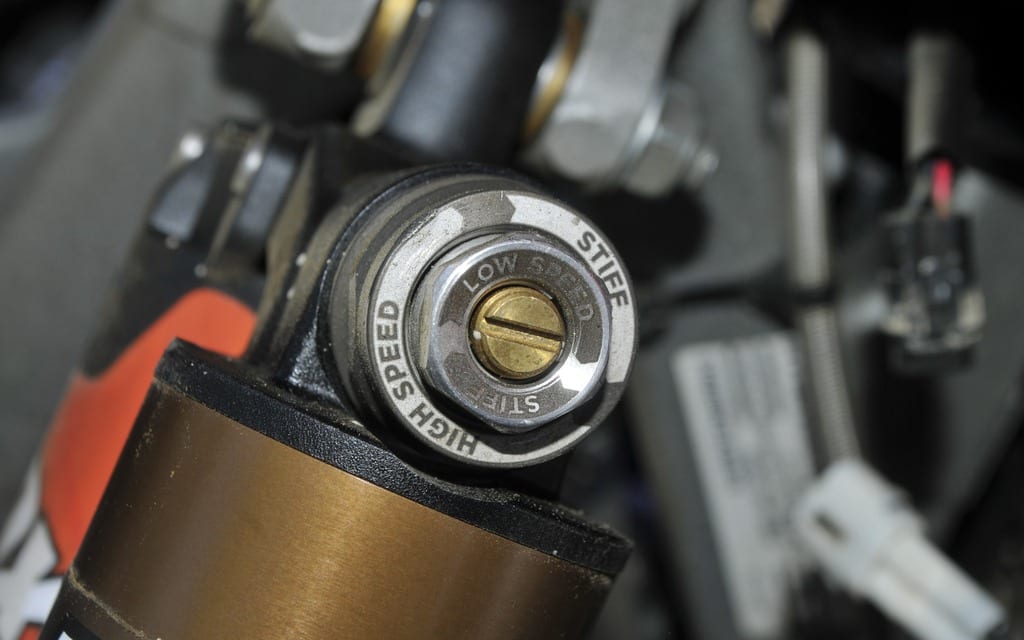
There are three main adjustments that can be made to ATV shocks: preload, compression and rebound. Some higher quality and priced shocks offer two different compression adjustments: Low-speed compression and High-speed compression which has nothing to do with how fast you’re rolling but rather how fast the shaft of the shock enters its body during its stroke.
PRELOAD
Preload, how compressed the springs and shocks are when the vehicle is just standing still, is the most basic and one you must already know about since almost all ATV shocks let you adjust preload. Even if you are already equipped with many adjustments on your suspension system the preload adjustment should be the first one to take care of. For now if you have knobs or screwdriver or wrench types of compression adjustments and maybe a rebound also, leave them at the factory setting. The clickers for the compression and rebound are shaft speed sensitive so do nothing on your garage floor. Those will need to be adjusted later in between test runs with the vehicle. You can adjust high-speed compression and low speed compression with the adjusters at the top of the shock. Rebound is adjusted at the bottom. In some rare cases, like on the Polaris Scrambler 1000, the shocks are installed upside down so it would be the opposite.
Preload is adjusted according to the rider’s weight. Think about it, when you buy a new ATV the manufacturer doesn’t know how much you weigh. They try to accommodate a wide range of different skill levels, weights and particular uses; they are forced to compromise and go with a middle ground setup.
FOX now has a line of FLOAT shocks, which stands for FOX Load Optimized Air Technology; replacing the heavy springs with their unique and patented FLOAT air springs controlled by air pressure in the main body. Air pressure is infinitely adjustable anywhere from 50 PSI to 300 PSI. A small hand pump is used to fill the air spring chamber. While single rate coil springs offer a linear curve that can work extremely well when used in conjunction with today’s advanced linkage designs, air springs give a progressive spring rate, offer infinite adjustability, and can provide significant weight savings (up to 6 lbs.)
Most shocks use a common 5-position bottom collar with several steps; turning it changes the spring pressure or amount of preload. Simple enough; you can either add more spring pressure to stiffen up your suspension or back it off to get a smoother ride. It’s good to keep in mind that increasing preload will reduce rear end squat.
Measurements need to be taken note of and kept in an organized fashion for later reference.
Make sure your workspace floor is completely level. Make sure that the tires have equal tire pressure from side to side. This is commonly overlooked and can significantly change your measurements. Lift the front end of the quad until the A-arms are fully extended but the tires are still in contact with the ground. Take a measurement from the floor to a center point on the front of the quad’s frame (mark the point with a marker because you must use that as a point of reference for future measurements). This is called the “unloaded measurement.” Once this measurement has been taken, put the unit back on the ground and bounce the front suspension to let it settle in. Now measure from the ground to the same point on the frame. Subtract the weighted measurement (the second measurement) from the unloaded measurement (the first measurement) to obtain your free sag value. Ideally, the number you get after doing the math should be around 10 percent of your quad’s total suspension travel (example: 1 inch of free sag for 10 inches of total suspension travel). Metric measurement allows for quicker conversions from percentages to actual measured numbers. If you use metric measurements the math is much easier to calculate (ie. 33 cm x 0.10 = 3.3 cm).
Your vehicle’s tool kit might have the perfect spanner to turn the preload adjustment or you can also just use a large set of channel locks or even a pipe wrench, ideally with a rag so to not damage anything. To make this easier the vehicle should be securely jacked up to reduce pressure on the spring.
Almost as common, are preload adjustments using double locking threaded rings. This is a more precise adjustment since your not limited to pre-set positions. After loosening the lock ring unlocking the adjuster ring (the one in direct contact with the spring) you must place it at the desired position and then lock it in place by re-tightening the lock ring against it.
Ride height and rake is also determined by the intended use of the quad (a flat track racer would seek a much lower ride height than that of a trail rider), but in stock form, extreme changes will not be possible.
Ok now you need to call a buddy and grab that measuring tape again, we need to adjust the preload with you in full gear sitting on the quad levelled with tire pressures set. Try to have about the same amount of gas in the tank and it is very important that you always sit in the same spot on the bike for all measurements. Force the suspension to set by jumping up and down a bit and then drop your bum on the seat in normal riding position. Next adjust it to the desired ride height. Measure from the floor to the bottom of the frame in the foot peg area. Now measure your front ride height 20 to 22 inches forward of the foot peg area and adjust it with the preload adjustment on the front shocks until the front is 0 – 1/4 inch higher then the measurement you just took at the peg. The higher the front is than the rear the more rear wheel traction you will get but if you get the front too high you will notice that the front will start to understeer. This is called suspension rake and it changes depending on your model and riding style. A good round number for rake is 3/8” to 5/8”. When adjusting take weight off suspension and grab the spring with both hands and finger on ride height adjuster and turn the whole spring.
If you have a single-spring rear shock setup, 30 percent of the total travel should be used in race sag. Race sag is the difference between an unloaded suspension and that with you sitting on your quad. The measurement should be taken at the rear axle. For an ATV with 9 inches of rear-wheel travel, the sag should be 3 inches. On an ATV with 9 inches of travel, it is just less than an inch. If you are too heavy for the spring rate, you will have to crank in so much preload to get the 3 inches of race sag that you’ll end up without any free sag: the only solution is a stiffer spring. Conversely, if you are too light and unable to get the 30 percent race sag with 10 percent static sag, a lighter spring is needed.
COMPRESSION
When setting a shock with only one compression adjuster, remember that this is basically your low speed compression adjustment. On most of today’s shocks the high-speed adjustment is only changed internally with different shim stacks. This is referred to as shock valving. The compression adjuster is generally located at the top of the shock or on the reservoir. You want to turn this in as little as possible. The further out (counter clockwise), the softer the ride will be and the more traction you will get, the more the wheels will stay on the ground. However, to handle constant bumps like desert or rough woods riding, it may be necessary to use a stiffer setting. Never keep the dial all the way in (clockwise) as it may cut off oil flow. It can damage chassis components due to pressure spikes.
When two separate compression adjustments are available the LSC (low speed compression) adjuster primarily affects the compression damping during slow suspension movements such as g-outs or smooth jump landings. It also affects wheel traction and the harshness or plushness of the vehicle (note that low-speed has nothing to do with the speed of the vehicle!). Choose a LSC setting that gives good body control (roll in corners, dive under braking, squat under acceleration, etc) without causing excessive harshness or loss of traction. The HSC (high speed compression) adjuster mainly affects the compression damping during medium to fast suspension movements such as steep jump faces, harsh flat landings and aggressive whoops. The goal is to run as little high-speed compression damping as possible without bottoming.
Symptom: Rigid, harsh ride
Remedy: Decrease low-speed compression
Symptom: Excessive body roll, wallows dives or squats
Remedy: Increase low-speed compression
Symptom: Bottoms out on steep jump faces or flat landings.
Remedy: Increase high-speed compression
Symptom: Suspension not using full travel
Remedy: Decrease high-speed compression
A rough suspension test can be performed, when standing on the pegs bounce up and down as if you were landing a jump. You want the front end and rear end to go up and down evenly on both the down stroke, and when it comes back up. You don’t want one end springing back faster than the other. Also, when standing on the front bumper make sure it does not bottom out the shock. If your shocks have rebound adjustment (how fast it comes back up) make sure it does not spring back too quickly, or too slowly. When you feel you’ve done a good job of making sure it is even from front to back, and not too soft or overly stiff, it’s time to hit the track or trail for ride testing and to dial it in more precisely.
REBOUND
Rebound is how quickly the shock returns to it’s normal position. Setting the rebound at full hard slows the return of the shock to its extended position. At this setting as a rider speeds over bumps the shocks may not return to position fast enough causing the shocks to “pack up”. If your quads shock packs it will kick side to side. However if your rebound is set to fast it can cause the quad to kick off over bumps and lose a lot of traction. This is an area that has to be experimented with every time you change the type of terrain you ride on. For slower rebound, turn the rebound adjuster knob clockwise. For faster rebound, turn the rebound adjuster knob counter-clockwise.
The best way to set the rebound on your shocks is to find a set of “whoops”: a series of rolling hills two feet high and six feet apart. With the setting at full soft, ride through the whoops at a slow pace at first. Then each time you ride through the whoops go through a little faster adjusting the rebound until you reach your fastest comfortable speed and the ATV is returning to its correct position without bucking you off. Remember that the faster you get from one bump to the next, the faster you want your rebound. For example on a flat MX track with the occasional jump, a slower setting will keep the quad low in the rear for better traction. For a rough trail, you need quicker rebound to reset the shock for the next compression stroke. If your quad doesn’t rebound before the next bump, it won’t use all of its travel.
YOUR CHEAPEST AND BEST POSSIBLE UPGRADE
Be sure to take the time to adjust ATV shocks or have them adjusted so you can get the most out of your ride before anything else. It makes no sense at all to spend money on engine or power upgrades if your suspension isn’t set up to let you safely use the power you already have. The right suspension adjustments don’t make the ride more powerful but they make you faster and more powerful and safer on it. Be patient and try and pay attention to each adjustment you make repeated runs on the same bit of trail or track and you will eventually be rewarded with the discovery of your smile-inducing sweet spot!