Being able to stop is far more important than being able to go. Checking your brakes for proper operation and doing this every time you start your ATV is a safe practice, and it is a good habit to get into. Checking your ATV’s brakes for mechanical wear periodically is another good idea. If you ATV squeals at you every time you pull on the brakes, then the following procedure is long overdue. The following story is a step by step article to illustrate how to change your ATV’s brakes. The project ATV is a’07 Outlander 800 with 2500 miles on it, along with the brake pads that are over 50% worn.
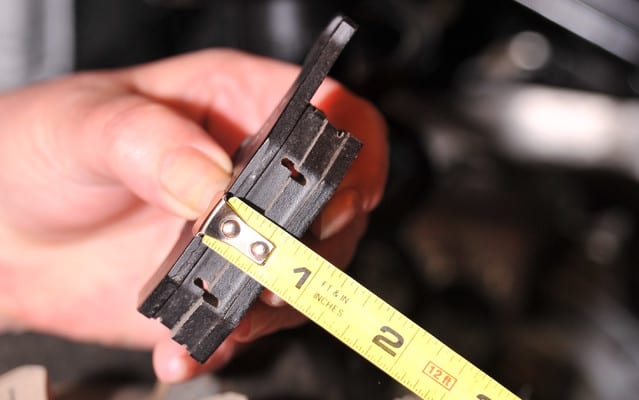
First, we suggest that you have the replacement parts in hand before you start this project. BRP sells each front wheel pad kit and the rear pads separately. ATV Trail Rider has done some research on brake pads. The stock pads are made with a softer compound, while aftermarket pads tend to be a harder compound. The stock, soft pads do brake better, but they do tend to wear out faster. While the hard aftermarket pads take more effort to pull on the brakes, they do last a long time and do tend to wear into the brake rotor when compared to the stock pads.
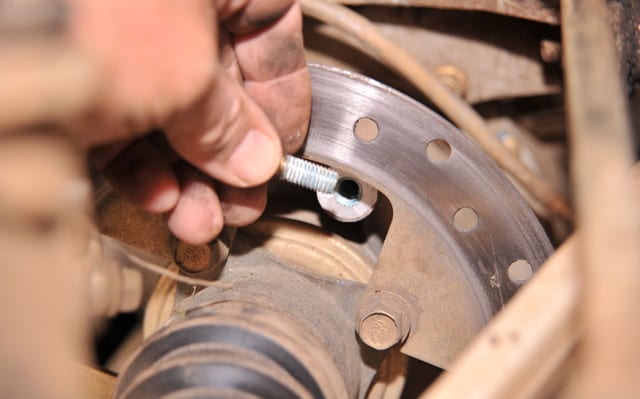
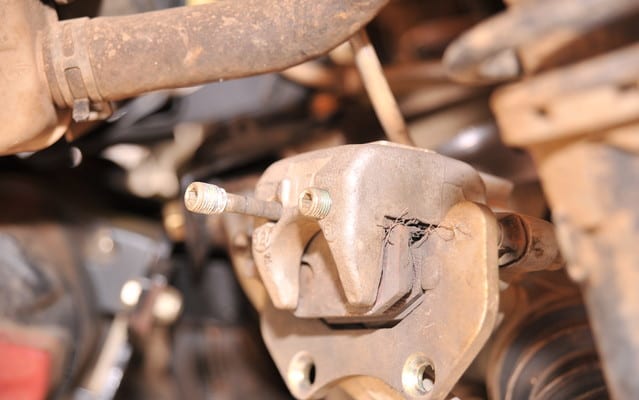
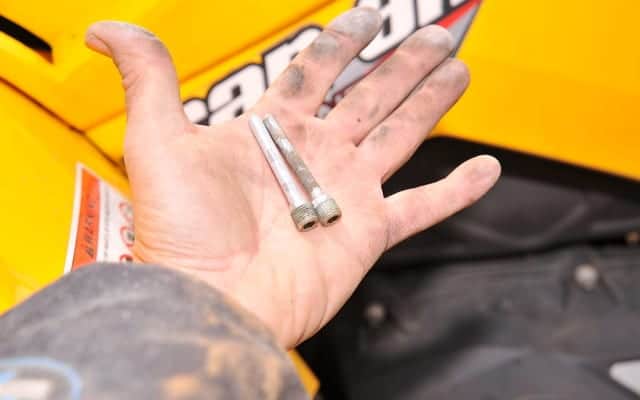
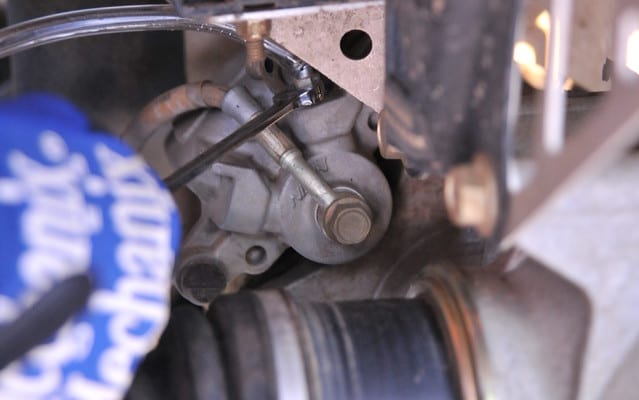
With just a simple set of mechanics’ Tools, you will be able to do this relatively simple task. The first mechanical step: jack up your vehicle and remove the wheel. Make sure that your ATV is supported securely; keep as much as possible clean and free space around the entire vehicle, safety first! This will give you the room to move and gain access to the caliper mounting bolts. Once these 2 Torx bolts are removed, one can slide the caliper out for service. Now you can remove the 2 retaining pins. Notice that these pins have an Allen key fastening system, unlike the Torx heads used on the caliper mounting hardware. While they look similar, they are different and require different tools.
Be careful when handling the caliper and the flexible brake line, do not put any stress on the flex line. Next, remove the retaining pins. They can be pulled out. If theses pins are stuck, one can pull them out with a set of pliers, but be careful not to damage the fastening threads on these pins. With the pins removed, the pads can be removed. Sometimes, the pads are worn away and the metal backing wears against the brake rotor, giving you that metal on metal brake squeal. If this is the case, check you rotor for wear, the disc should be smooth from the inside to the outside of the braking surface, and be sure to check both sides. If these surfaces are damaged, the rotor will need to be replaced.
Brake Assembly
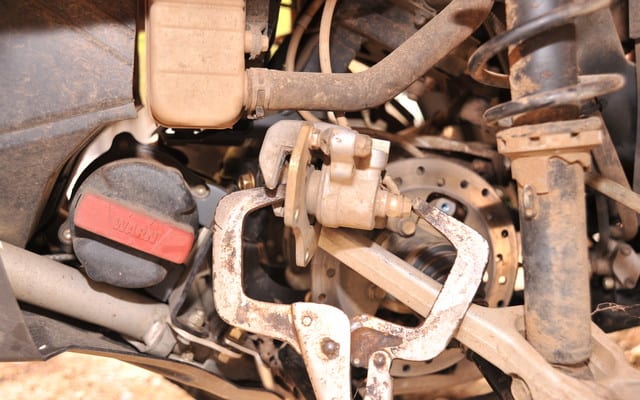
With everything apart, make sure everything is relatively clean and now it is time to reassemble. The new pads are much thicker when compared to the old pads; so the distance in the caliper needs to widen to accommodate the thicker pads. This is done with C-clamps, or in this case a pair of Vise-Grip tongs. One needs to push the caliper piston back into the caliper.
If the pads do not retract easily, then loosen the brake fluid bleed screw, and drain some fluid. Be careful with brake fluid it can be toxic and can remove paint. An instant clean- up is in order. Use a plastic hose that will help to bleed and control the fluid.
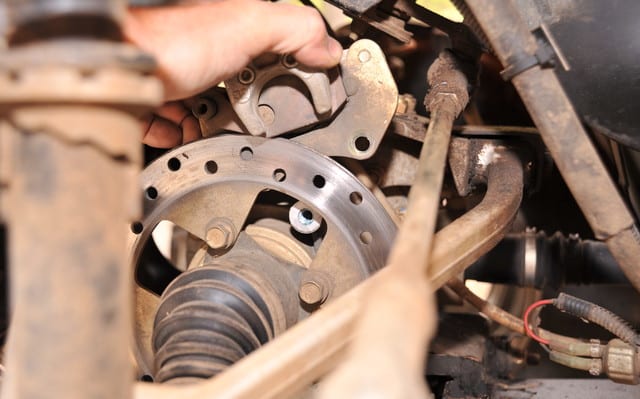
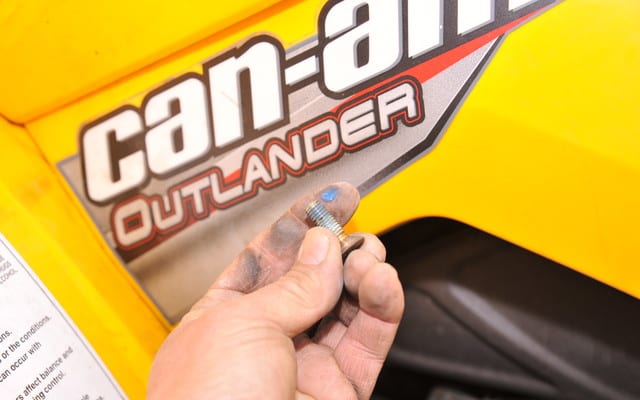
Now is a good time to clean the brake rotor with brake clean solvent. Spray and wipe, dry and try to clean the entire rotor and surrounding parts. With the piston backed off, there will be enough room to dropin the new pads. Before replacing the retaining pins, check the retaining shafts for wear, and clean the pin surface. This shaft should be smooth, one can sand any wear marks smooth; fine sandpaper works well for this job. This will give the pads a good surface to slide on. Another thing, if you cannot get these pins smooth, replace them. This helps for a smoother mechanical brake operation. Install the retaining pins; you will have to put pressure on the pads for the proper pin alignment and make sure that there is a drop of blue Loctite on each pin to keep them in place, until the next service. The next step is to drop the caliper assembly back into position. Be careful to make sure that the pads are on both sides of the brake rotor, as you slide the assembly into position. You can use a standard screwdriver to manipulate this assembly into position. Once the caliper is in position, you can replace the caliper mounting bolts; don’t forget to use a drop of blue Loctite on each bolt to keep them in place.
If you didn’t need to break the seal in the brake line fluid during this service, just pump the ATV’s brake lever until the pressure returns.
If you did break the seal, you will need to bleed the brake system, read on.
Both front brakes should be done together in order to keep the ATV’s braking balance. If the front brakes need to be done one should consider the rear brakes as well. Each caliper is done in the same manner and in the same order as described.
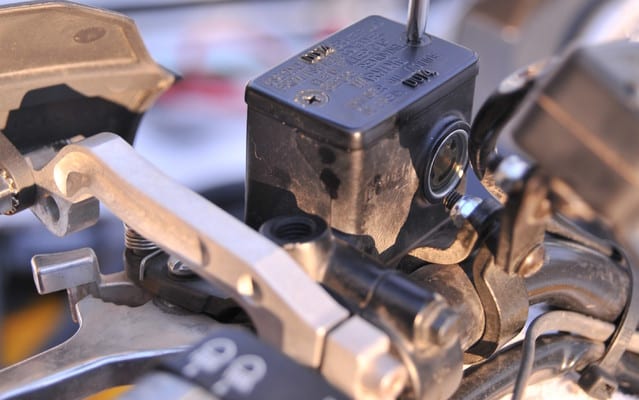
How to change your brake fluid and bleeding your brakes
Brake flushing is much like bleeding air from the system. The most common method is the tried-and-true two-person procedure. It’s easier done than described and can be done in 10-15 minutes. First, remove the lid from the master cylinder from the left side of the handlebar (be sure to clean around the lid first, to prevent any dirt from falling into the reservoir). Here, you start by slipping a piece of clear plastic hose over the bleeder valve on your brake caliper, it should fit snugly. Place the other end of the hose into a clear container, such as a glass jar or plastic milk carton, submerged in brake fluid (being able to see through a clear container will be helpful). Have your assistant pump the brake lever a few times to build up pressure, than on an inward stroke, hold the lever in slightly. While he or she is holding the lever in, use a wrench to open the bleeder valve, just enough to let a surge of brake fluid escape into the hose and container. Your assistant should then slowly squeeze the lever and hold it there long enough for you to immediately close the bleeder valve again, to prevent air from being drawn back into the lines. Repeat this procedure several times.
The key here is to keep the fluid level in the master cylinder above the minimum mark, by repeatedly adding fresh fluid. Once you begin seeing fresh, clear fluid coming out the clear tubing (with no air bubbles) coming out of the bleeder valve in place of the old, dark fluid, you can tighten the valve. That’s it, you are done.
Be careful not to spill any brake fluid, it can act as paint remover. Be sure to have a good clean up afterward. This includes your hands; brake fluid is very hard on your skin!
See how simple and easy that was? So the last and very logical step is to go out for a test run, making sure you don’t roll away too fast before your first squeeze of all your different brake controls to test them out. Knowing that your brake system is in good working order will give you, and your loved ones, peace of mind.
ATV Brakes, the why and how to do a total fluid change.
There is no question that your ATV’s braking system is important and take a guess at the most neglected part of your ATV? Yep…brake fluid. Yet, many ATV manufacturers don’t have any recommendations for changing brake fluid. They all say inspect the braking system and check the level and if it is up, then all is okay. However, know that changing your brake fluid can protect you and your braking system from expensive corrosion damage, and further extend the life of your ATV.
Types of brake fluid
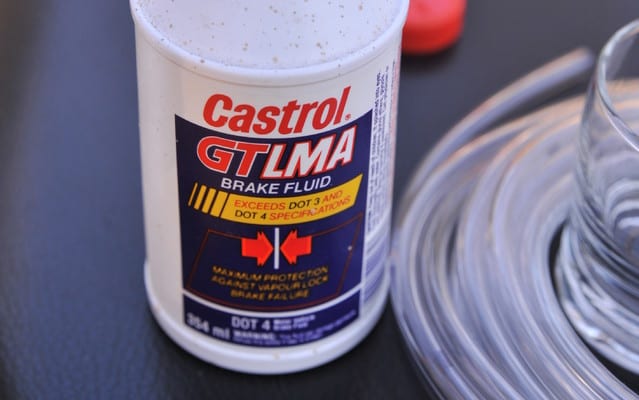
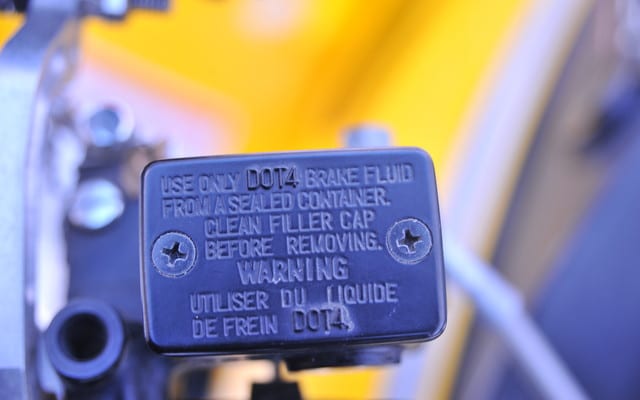
In the United States, the Department of Transport (DOT) regulates brake fluid specifications. Rather than specify exactly what brake fluid is, they specify all the criteria that must meet certain spécifications, such as the ability to flow in cold weather, the boil point at high temperatures, and to be compatible with different types of materials within the brake system. They label the fluids according to how they meet the different classes with DOT 3, DOT 4, etc. Today most manufacturers use DOT 4 type brake fluid. The difference with DOT 4 type fluid is it has a higher boiling point. These fluids are glycol-based and as such are hygroscopic. That means they will absorb water. Leave a container open and it will absorb water from the air. In the brake system, it will slowly (over years) absorb water through the rubber hoses and parts. When adding new brake fluid, be sure it is the appropriate type for your vehicle; it will be listed in the owner’s manual or marked on the reservoir cover.
Conventional glycol-based formulas are designated as DOT 3 and DOT 4, which differ mainly by their boiling points. While the two are compatible, DOT 4 has a higher boiling point, so if your vehicle is designed for DOT 4, don’t substitute to DOT 3. If DOT 3 is recommended for your ATV, you can use either type. Castrol also markets a brake fluid called LMA, for Low Moisture Absorption. This is formulated to last longer than conventional types, because it takes longer to reach its saturation point, and also boasts a higher boiling point.
It is important to note that DOT 5 brake fluid, which is silicon-based, is NOT compatible with conventional fluid and should NEVER be added to a system using DOT 3 or 4. DOT 5, which has a purple colour, doesn’t absorb moisture, and has a higher boiling point.
Why you should change your brake fluid and helpful tips
Flushing your brake fluid is preventative maintenance; with conventional glycol-based brake fluid absorbing water over time. Flushing is important, in order to keep condensation from the brake system causing corrosion. Eventually, the fluid will absorb all the moisture it can hold, reaching its point of saturation. Several things can happen at this point. Unabsorbed moisture can begin to collect in the system, causing corrosion in critical areas; the water can cause seals to swell and deteriorate, further contaminating the fluid; and the boiling point of the fluid drops beyond recommended levels. This means that under high-heat braking conditions, such as during hard braking or repeated brake application while descending a mountain, the fluid will start boiling sooner, which will reduce braking performance. The lever can begin to feel spongy, and as braking efficiency drops, it takes longer to stop the vehicle and precision is also lost in the controls.
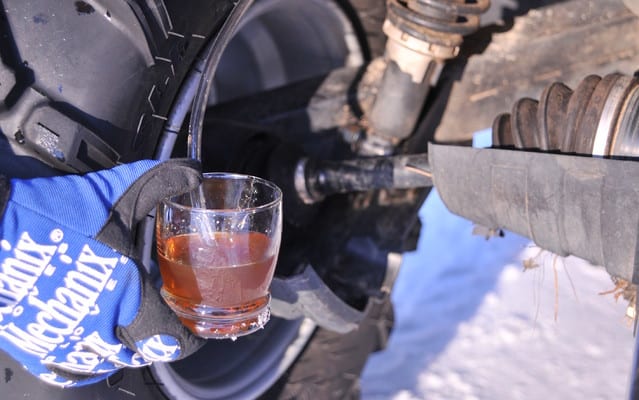
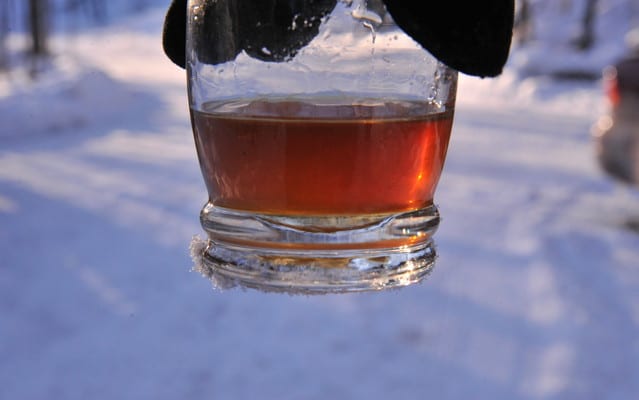
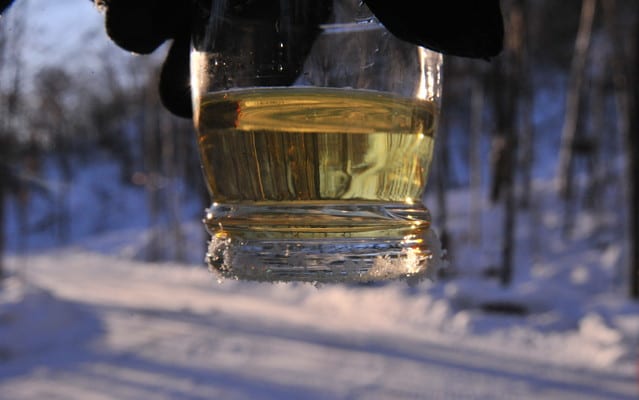
How do you know when the system should be flushed? It is recommend changing the fluid every two years, because of the unusually humid climate and the constant changes in temperature in our sport. However, your eyes can tell you when the time has come. Fresh brake fluid is transparent and has a slight amber-coloured look. As the fluid absorbs moisture, it takes on a darker, cloudy appearance, which tells you it needs changing. Fresh brake fluid has a boiling point of about 400 degrees F or higher. As it absorbs moisture, however, the boiling point will gradually drop. So the cost of a bottle of brake fluid is cheap, practical and real good insurance.